Get The Most Affordable Hosting in the World!
Starting at just $1.87/month, Vercaa offers unbeatable pricing for world-class web hosting services.
Fast, reliable, and secure hosting to power your website without breaking the bank. Plus, enjoy a free CDN for faster loading times worldwide!
Get Started Now!In this chapter, let us study about Creating content. In Drupal, content type defines the style in which contents are collected and displayed. When you install Drupal, by default two content types will be fixed and they are Articles and Basic page. When you enable other core and contributed modules by visiting Modules you can also use other content types.
Following are the simple steps used for creating content.
Step 1 − Click Content as shown in the following screen.

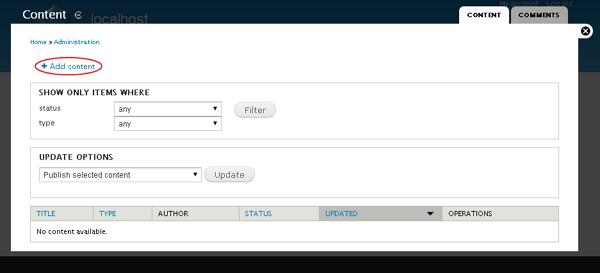
Step 2 − Click on Add content as shown in the following screen.

Step 3 − You can choose any of the content type. We shall take Basic page as we have already studied about Articles and Blog entry. Click Basic page as shown below in the following screen.

Step 4 − Next, you will see the screen as shown in the following screen. You can add content to the page and click the Save button to save the content.

Following are the details about the fields present in the preceding screen.
-
Title − It specifies the title of the page.
-
Body − Write the content of your page.
-
Menu setting − It allows you to provide a menu link.
-
Revision Information It provides an explanation of the changes you are making.
-
URL path settings − It allows you to optionally define an alternative URL, by which your content can be accessed.
-
Comment Setting − It allows users to send their comments depending upon the permission you set that is Open or closed.
-
Authorizing information − It specifies the author information.
-
Publishing options − It permits you to promote your content to the front page and stick your content on top of the list on the front page.
Step 5 − Finally, you can see your page will be created and displayed similar to the following screen.

The End! should you have any inquiries, we encourage you to reach out to the Vercaa Support Center without hesitation.


